Roofing tar has a long history, dating back to its use by ancient sailors. They used tar to make their ships waterproof and shielded from the harsh sea conditions.
Even today, roofing tar is still essential in modern roofing applications. Its main purpose is to provide strong leak protection and efficient waterproofing for different types of roofs. Whether you’re using asphalt-based or coal tar options, this dark, oily substance is crucial for keeping roofs intact and lasting longer.
Understanding Different Types of Roofing Tar
Roofing tar plays a crucial role in roof maintenance and repair, with two primary types available: asphalt-based roofing tar and coal tar pitch.
-
Asphalt-Based Roofing Tar
Asphalt-based roofing tar is widely used for its durability and water resistance. It is derived from petroleum byproducts, making it an effective waterproofing agent for various roofing materials. This type of tar:
- Durability: Offers long-lasting protection against water damage.
- Versatility: Suitable for a variety of roof types, including flat and low-slope roofs.
- Affordability: Generally more cost-effective compared to other options.
-
Coal Tar Pitch
Coal tar pitch, on the other hand, is derived from coal processing and is known for its superior resistance to UV radiation. Despite its benefits, this type of roofing tar comes with significant health and environmental concerns:
- UV Resistance: Provides excellent protection against sun damage, extending the life of the roof.
- Adhesive Properties: Creates a strong bond with roofing materials, enhancing structural integrity.
Health Risks: Emits noxious fumes that can be hazardous during application.
Environmental Considerations
When choosing between types of roofing tar, it’s essential to weigh environmental impacts:
Noxious Fumes: Both asphalt-based and coal tar pitch emit harmful fumes during application; proper ventilation and safety measures are crucial.
Eco-Friendly Options: Some modern alternatives aim to reduce environmental footprint, offering less toxic formulations without compromising performance.
By understanding the properties and benefits of each type of roofing tar, you can make an informed decision that balances performance needs with environmental considerations.
Pros and Cons of Using Roofing Tar for Your Roof
Advantages:
Leak Protection and Waterproofing: One of the standout benefits of using roofing tar is its exceptional ability to seal and protect against leaks. This makes it a popular choice for flat roofs where water accumulation can be a significant issue.
Durability and Longevity: When applied correctly, roofing tar provides a durable and long-lasting solution, often extending the lifespan of your roof by several years.
Energy Efficiency Improvements: Roofing tar can also enhance energy efficiency by reflecting sunlight, which helps in maintaining a cooler temperature inside the building. This can lead to reduced energy bills over time.
Potential Drawbacks:
Hazardous Application Process: Applying roofing tar involves dealing with hot materials that emit noxious fumes. This process requires specialized safety gear and expertise to avoid burns and inhalation risks.
Structural Support Requirements: The weight of roofing tar can be substantial, necessitating a strong underlying roof structure. Insufficient structural support may lead to sagging or other damage over time.
Despite these drawbacks, many homeowners find that the benefits of using waterproof roofing tar outweigh the potential risks, especially when proper safety measures are in place. Balancing these pros and cons helps in making an informed decision about whether roofing tar is suitable for your specific roofing needs.
When Is the Right Time to Use Roofing Tar?
Determining the optimal time for roof repair with tar is crucial for effective results. Let’s explore the key considerations:
Ideal Conditions
Temperature: The best temperature range for applying roofing tar is between 40°F to 70°F. This ensures the tar remains pliable and adheres properly, avoiding cracks or uneven application.
Weather: Dry weather conditions are essential. Rain, snow, or high humidity can interfere with the tar’s ability to bond and cure correctly. Check the forecast for clear skies to plan your application day.
Situations Where Roofing Tar Is Most Effective
Flat Roofs:
Roofing tar excels on flat roofs due to its excellent waterproofing properties.
It creates a seamless barrier that prevents water accumulation and leaks, making it ideal for commercial buildings and residential flat roofs.
Steep Roofs:
While not commonly recommended for steep roofs due to runoff issues, roofing tar can still be used in specific situations.
For instance, patch repairs on small sections or valleys of a steep roof can benefit from the durable seal that tar provides.
Understanding these factors helps you determine when to use roofing tar effectively. This knowledge ensures you achieve a long-lasting, protective layer for your roof.
Essential Materials Needed for a Successful Roofing Tar Application
Applying roofing tar like a pro requires the right tools and materials. Here’s a comprehensive roofing materials checklist to ensure you have everything you need.
Tools and Materials
Tar Kettle: Essential for heating the tar to the right consistency.
Mop or Applicator: For spreading the tar evenly across the roof surface.
Fiberglass Mop: Ideal for applying thin, uniform layers of tar.
Bucket or Transport Truck: Used to carry hot tar from the kettle to the rooftop.
Roll Roofing and Roofing Felt: Provides an additional layer of protection.
Utility Knife and Measuring Tape: For precise cuts and measurements.
Brooms and Roofing Spades: Useful for cleaning and preparing the roof surface.
Safety Gear Recommendations
Working with roofing tar involves exposure to high heat and potentially hazardous fumes. Prioritize safety by equipping yourself with appropriate protective gear:
Heat-Resistant Gloves: Protect your hands from burns while handling hot tar.
Goggles: Shield your eyes from splashes and debris.
Long-Sleeved Clothing: Minimizes skin exposure to hot tar splatters.
Ventilation Equipment: Ensures proper airflow, reducing inhalation of noxious fumes.
Fire Extinguisher: A crucial safety measure in case of accidental fires.
Having these materials on hand sets the stage for a smooth and efficient roofing tar application, paving the way for a durable, leak-proof roof.
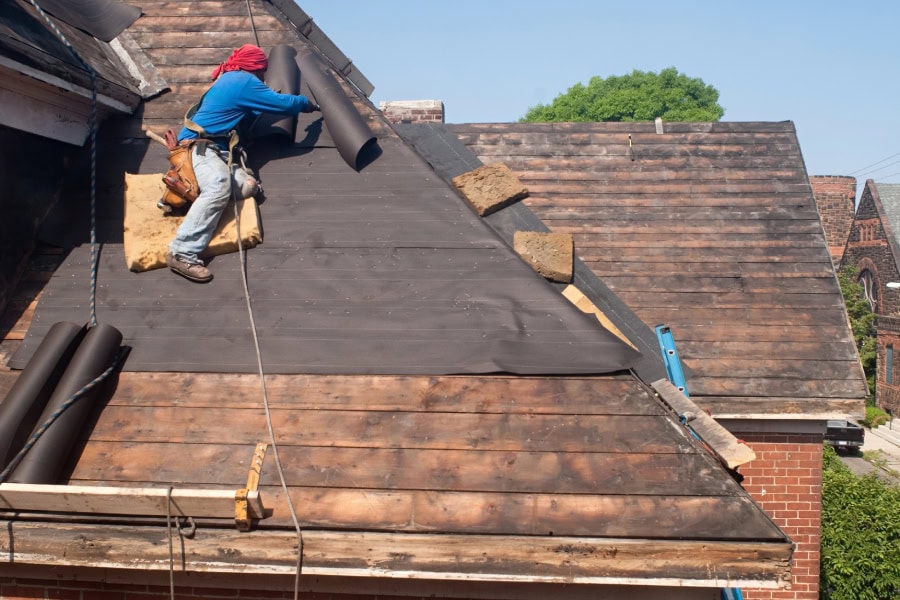
Guide on How to Apply Roofing Tar Like a Pro
Applying roofing tar correctly can make a significant difference in the longevity and effectiveness of your roof. Here’s how to apply roofing tar like a pro:
Inspecting the Roof for Damage Before Application
Before you start, take time to thoroughly inspect your roof for any existing damage. Look for:
- Cracks or Blisters: These can indicate underlying issues that need fixing.
- Loose Shingles or Debris: Ensure everything is secure and clean.
Repair any minor damage you find to provide a solid foundation for the tar application.
Preparing the Surface (Cleaning and Drying)
A clean surface ensures better adhesion of the roofing tar. Steps include:
- Remove Debris: Sweep away leaves, dirt, and other debris using a broom or blower.
- Wash the Roof: Use a pressure washer for thorough cleaning.
- Dry Completely: Allow time for the roof to dry completely to prevent moisture trapping.
Applying the Base Layer and Spreading the Tar Evenly
For a smooth and effective application:
- Apply Primer: Start with a primer layer if recommended by the manufacturer.
- Heat the Tar: Use a tar kettle to warm the tar until it reaches a pourable consistency.
- Pour and Spread: Pour the heated tar onto the roof in small sections.
- Use an Applicator: Spread the tar evenly using a mop or specialized applicator.
- Ensure Coverage: Overlap previous layers slightly to avoid gaps.
Safety Precautions You Must Take During the Application Process
Ensuring safety during roofing tar application is crucial. The process involves handling hot materials and exposure to hazardous substances. Here are some key safety measures to follow:
-
Personal Protective Equipment (PPE):
- Wear heat-resistant gloves and long-sleeved clothing to protect against burns.
- Use goggles to guard your eyes from splashes.
- A respirator mask can help mitigate inhalation risks from noxious fumes.
-
Ventilation Techniques:
- Proper ventilation is critical due to the noxious fumes from roofing tar. Ensure you’re working in a well-ventilated area.
- Set up fans or ventilation systems to dissipate fumes quickly.
-
Heat Management:
- Keep the tar kettle at least 25 degrees below its flashpoint to prevent fires or explosions.
- Avoid placing flammable materials near the working area.
-
Emergency Preparedness:
- Have cold water and first-aid supplies readily available for immediate treatment of burns.
- Keep a fire extinguisher on hand as a precautionary measure.
-
Weather Conditions:
- Apply roofing tar only in dry weather conditions, ideally between 40-70°F, to avoid complications and ensure optimal adhesion.
Taking these safety precautions can significantly reduce risks during the roofing tar application, making it safe for both professionals and DIY-ers.
Should You Hire a Professional or Go the DIY Route?
When deciding between professional vs DIY roof repairs with roofing tar, several factors come into play:
DIY Considerations
- Skill Level: If you have prior experience with roofing projects and are comfortable working at heights, a DIY approach might be feasible.
- Cost Savings: Tackling the project yourself can save on labor costs. However, ensure you’re equipped with the correct tools and safety gear.
- Simple Repairs: For minor issues like small leaks or cracks, a DIY repair could be practical.
Professional Help
- Complexity of the Job: Extensive damage or large-scale projects often require professional expertise to ensure quality and longevity.
- Safety Concerns: Professionals are trained to handle hazardous materials like roofing tar safely and effectively, reducing the risk of injury.
- Warranty and Guarantees: Hiring a licensed contractor typically comes with warranties on both materials and workmanship, providing peace of mind.
Pro Tip: Evaluate the scope of your project carefully. For intricate repairs or if you’re uncertain about your skills, seeking professional assistance is often the best route.
Making an Informed Decision on Your Roofing Needs
Taking the time to learn about roofing tar and understand its application can be incredibly beneficial for your home maintenance routine. Whether you’re considering a DIY approach or hiring a professional, having comprehensive knowledge will help you make the best choice.
For those who prefer professional assistance, reaching out to our local roofing services can provide peace of mind. Our commitment to quality craftsmanship and exceptional customer service makes them an excellent choice for your roofing needs.
Need expert help? Contact Divided Sky for professional assistance with your roof repairs or maintenance today.
FAQs
What is roofing tar and why is it important?
Roofing tar, which can be asphalt-based or coal tar, has a significant role in modern roofing applications. It provides a waterproof barrier that protects roofs from leaks and weather damage, making it essential for maintaining the integrity of various roofing systems.
What are the different types of roofing tar?
The two main types of roofing tar are asphalt-based and coal tar pitch. Asphalt-based roofing tar is known for its durability and ease of application, while coal tar pitch offers excellent waterproofing properties but may involve more hazardous fumes during application.
What are the pros and cons of using roofing tar?
The advantages of roofing tar include its effectiveness in leak protection and waterproofing, and potential energy efficiency improvements. However, drawbacks include a hazardous application process that requires structural support considerations and safety precautions due to noxious fumes.
When is the right time to apply roofing tar?
Ideal conditions for applying roofing tar include dry weather and temperatures above 50°F. Roofing tar is most effective on flat roofs where water pooling is common, but it can also be used on steep roofs under suitable circumstances.
What materials do I need for a successful roofing tar application?
Essential materials for applying roofing tar include a tar kettle, mop/applicator, and protective gear such as heat-resistant gloves and goggles. A checklist of roofing materials should also be prepared to ensure a successful application.
Should I hire a professional or attempt a DIY roofing tar application?
Deciding whether to hire a professional or go the DIY route depends on your experience level with roofing projects. If you’re confident in your skills and have the necessary safety gear, you might tackle it yourself; otherwise, hiring professionals ensures proper application and safety.
from: https://mydividedsky.com/what-is-roofing-tar-and-how-to-apply-it-like-a-pro/
No comments:
Post a Comment